
When running an A/B test, “flicker” occurs when one website variant loads, and displays on the site, before the other test versions show.
When multiple versions display, even for just a split second, the effect is called flicker, and it can greatly throw off test results.
For example, if you’re testing Call To Action (CTA) text, you don’t want the control version loading with the text “make good decisions” and displaying before the variant “make awesome decisions” shows.
Here’s a quick video showing what flicker looks like:
Clearly, flicker is detrimental because, for your experiment to be valid, you don’t want a user seeing multiple test variants, within one session.
So, what can you do?
Well, luckily, in the A/B testing platform, Google Optimize, the anti-flicker snippet — previously called the page-hiding snippet — can remedy this issue.
To activate the anti-flicker snippet within Optimize, it needs to be installed. However, installation is not always required.
One important question many testers have is: how do I know if I need to install the anti-flicker snippet?
In true CRO style, the answer is it depends. . . on two factors:
When installing Google Optimize, you can choose to run the application synchronously or asynchronously.
It’s important to understand these terms because it will help you identify which Google Optimize snippet you need to install on your site.
In very basic, simplified terms:
Synchronous means data is sent in blocks or frames and the transmission of this data is constant. As a result, the page won’t load until everything has rendered.
Here’s a visualization of how that looks; you can see, the page display is synchronized with the completion of Optimize loading:

When running A/B tests, this transmission method means the site won’t load until all variants have rendered, so flicker won’t occur. That’s good news for the validity of your test data.
But, the trade-off is, the site may load much slower than desired — which could negatively impact conversion results.

Asynchronous installation is the opposite. Data is sent in bytes or characters, and the transmission is not constant. As such, first the page loads, then all the elements on the page start to appear.
When A/B testing, the mode means the site may load element by element, with each test version loading and displaying before the site fully renders.
Here’s a visualization of how that looks:
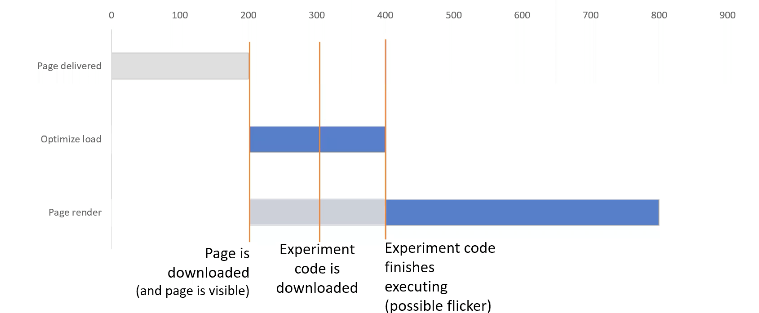
This mode can be much faster — since you don’t need to wait for everything to load before it displays. But, the trade-off is, it can cause flicker.

In the past, Google’s answer for dealing with page load delays, and flicker, was to recommend using the synchronous snippet — which loads faster — along with the anti-flicker snippet, to remove the flicker.
However, as of April 27, 2020, Google Optimize updated its installation snippet to a new JavaScript (JS) code. This date is very important to take note of because any documentation you find on the web prior won’t likely have the new snippet installation instructions and might cause you a lot of confusion.
With this new code, it’s now recommended you install Google Optimize’s default synchronous snippet.
The default synchronous snippet is recommended for most sites because, overall, it features the best performance and has minimal impact on your website’s page rendering speed.
By using the synchronous snippet, you should NOT need to also install the anti-flicker snippet. That’s because the page won’t load until all the variants have rendered — which has the same effect as the anti-flicker snippet. And, thanks to the new JS code, the page load speed is much faster, and also simpler to install. Win-win-win!
However, if your site loads notoriously slowly, and there’s not much you can do to easily fix that problem, you might want to consider running the asynchronous snippet, then manually installing the anti-flicker snippet.
A word of caution. This installation can be tricky. But the step-by-step tutorials (below) have been created to help guide you through every detail.
If you’re doing advanced targeting, using Google Analytics audiences or ad targeting, the Google Optimize resource hub suggests you may need to do an advanced installation, using the synchronous snippet, then adding the anti-flicker snippet.
If you installed any version of Google Optimize prior to April 27, 2020, you’re running an older installation snippet version.
Your installation likely used the asynchronous snippet, without the anti-flicker snippet. You’ll, therefore, likely need to install the anti-flicker snippet.
If you’re in the unfortunate situation where you do need to install the anti-flicker snippet, start by taking a deep breath.
It can be very complicated. . .
However, to reduce coding errors and nightmares, there is a recommended course of action. It involves moving the Google Optimize installation code into GTM (if you haven’t already done so), and then installing the anti-flicker snippet, using container IDs, in your site’s theme header.
This installation method is considered quite complex, but is best to do, especially if you have a large site, and/or multiple stakeholders accessing your Google optimization products.
You’ll see exactly how to do this installation in the step-by-step instructions by watching the instructional video below given by Todd Gamber, Chief Data Engineer at Confidence Interval, a specialized data analytics and marketing consulting firm.
Unfortunately, installing the anti-flicker does slow your page load speed because both variants need to load in the background before the page shows.
This fact can be problematic, especially for already slow-loading sites. Unfortunately, there’s not much you can do to remedy the situation.
The trade-off is, with the anti-flicker snippet, your experiment results won’t be convoluted.
If you’re interested in learning more about this issue, and what slows down a site, you can listen to this short video interview on The Dark Side of Using the Anti-Flicker Snippet:
If you choose to install the Optimize snippet directly within GTM — which is the recommended option — you’ll need to follow a 2-step process.
The first step requires you to disable the current Google Optimize snippet and re-install it into GTM (assuming you haven’t already installed Optimize in GTM). You will then need to configure the GTM tag. Here are step-by-step instructions for how to do so:
Note, these video instructions show how to disable the Optimize script within WordPress, using a header/footer code plugin. However, the process is similar for all other website platforms.
With the Optimize snippet installed in GTM, you next need to enter the anti-flicker snippet in your site’s theme header, using the GTM container ID.The anti-flicker snippet code is available here. Here are step-by-step instructions for how to install the anti-flicker snippet in your site’s theme header, using the GTM container ID:
Note, these video instructions show how to enable the anti-flicker snippet within a site theme header within WordPress. However, the process is similar for all other website platforms.
Once the anti-flicker snippet is hard-coded into your site, you won’t need to add it again. It will remain active for all future Optimize experiments.
However, if your website theme gets updated, or major changes are made to your website, the anti-flicker snippet may become deactivated and may need to be reinstalled.
One of the most debated testing topics is how large does my sample size need to be to get trustworthy test results? Some argue samples of more than 120,000 visitors per variant are needed to begin to see trustworthy test results. Ishan Goel of VWO disagrees. What does he think is needed to get trustworthy test results? Listen to this webinar recording to find out.
To get users clicking your content, which format works best: buttons or links. A series of 8 real-life A/B tests suggests one format consistently outperforms. Can you guess which version wins? Checkout the mini meta analysis to find out.
Learn how using Google Tag Manager (GTM) helps you overcome many of the limitations with Google Analytics 4 (GA4). Find out the best ways to use GTM to manage and derive the most meaningful data from GA4.


Fantastic article and videos. Thank you for your attention to detail and your clarity. Hugely helpful with setting up Google Optimize properly and thoroughly. Thank you!
Actually 1 question: In the <HEAD> section on every page, which script do you recommend placing higher? The GTM script or the anti-flicker script first? Thank you!
Drew, the Optimize snippet should be installed as high up in the head as possible. Depending on your set-up, and integration with other Google marketing products, the order should be:
1. JavaScript variables or DataLayer declarations
2. The anti-flicker snippet
3. The Google Optimize snippet
4. The hardcoded Google Analytics (GA) snippet and/or Google Tag Manager (GTM) snippet
very nice post, good amount of info, havent even eatched the videos yet
.(I think I will sign up :-))
Do you happen to have any experience with this set up and adding Google Consent Mode to the mix?
I read some pretty demoralizing comments about how data quality was affected and generally speaking the impression I got was unclear at the very least in rekation to these 2 Google products working well together. I hooe its just my researhing skills.
Sam -- Consent mode, which is still in beta, enables you to adjust how your Google tags behave based on the consent status of your users.
At present, you can obtain consent for Google Analytics (GA) and Google Ads cookies. These tags will dynamically adapt, obtaining measurement only for the areas where consent has been granted by the user.
In web mode, if the user denies GA storage -- which means GA cannot read or write first-party cookies -- cookieless pings will be sent to GA for basic measurement purposes. Google Optimize data is not affected by this setting.
Thanks for the answer. Viewed one of the videos too and it was quality. Definitely returning here.
Thanks, Sam! GuessTheTest is currently working towards creating a course on everything you need to know to set-up and run successful A/B tests in Google Optimize. Would this course be of interest to you?
Very helpful article. I'm trying to solve an issue with an AB Testing on an internal page (plans page which is dynamic), but the test does not load. I was able to see the variant version for 2 seconds, one or two times, but it loaded the control right after. The only change is CTA text...
I am working with GTM before April of 2020, and I also have the anti flicker message there.I also have an angular framework with virtual pageviews configured.
What can I do to get that to work?
Thank you.
Bruna
Hi Bruna, glad you found the article helpful. Sounds like the set-up is not quite working, although without seeing how everything is put together, it's hard to diagnose the problem. It could be a flicker effect, but usually flicker is seen only after the experiment is started and the control version loads before the variant. Have you confirmed Google Optimize is indeed installed and running correctly?
Hi,
Awesome conent that will help to solve the problem. I have a few questions here:
Thanks!
Hi Juras,
Thanks for your comments and questions. In answer to your questions:
1. Yes, Optimize can still be put into GTM without Analytics in GTM.
2. If you have the option, it's usually better to run Optimize hard coded into your site because it runs faster.
If you have other questions that weren't answered here, or you'd like more information, you're welcome to contact our partner, Confidence Interval for a free consult: https://www.confidenceinterval.com/
We have two pages and we need to do A/B Testing to know which pages is bringing more conversion so do I need to add antiflicker or it is okay to Go only with the Google optimize code before the GTM code.Let me know your experience in this
Anand - It depends how your A/B test is set-up and if flicker is a problem. If you're running a straight A/B test and the original (control) version does not flash before the new variant loads, you won't need the anti-flicker snippet. If you do see flicker, you'll want to install the anti-flicker snippet. Hope this note addresses your question. If not, please let me know. Thanks!